
定ピッチの罫線を追加するVBA関数
タイトルのマクロです。
'********************************
'* 定ピッチの罫線を追加する関数
'* startRng:左上のセル
'* endHorizontalCellCount:横線を引くセルの数
'* pitchHorizontalCellCount:このセル数ごとに縦線を引く
'* endVerticalCellCount:縦線を引くセルの数
'* pitchVerticalCellCount:このセル数ごとに横線を引く
Sub AddBorders(ByVal startRng As Range _
            , ByVal endHorizontalCellCount As Long _
            , ByVal pitchHorizontalCellCount As Long _
            , ByVal endVerticalCellCount As Long _
            , ByVal pitchVerticalCellCount As Long)

    Dim ws As Worksheet
    Dim lastRow As Long, lastClm As Long
    Dim startRow As Long, startClm As Long
    Dim rw As Long, clm As Long
    Dim pitchV As Long, pitchH As Long

    ' 対象のシートを設定
    Set ws = startRng.Parent
    ws.Cells.Clear

    ' 左上の行数、列数
    startRow = startRng.Row
    startClm = startRng.column

    ' 最終行・最終列を取得
    lastRow = startRow + endVerticalCellCount
    lastClm = startClm + endHorizontalCellCount

    For rw = startRow To lastRow Step pitchVerticalCellCount
        ' 横線のピッチ
        pitchV = WorksheetFunction.Min(rw + pitchVerticalCellCount, lastRow) - startRow

        For clm = startClm To lastClm Step pitchHorizontalCellCount
            ' 縦線のピッチ
            pitchH = WorksheetFunction.Min(clm + pitchHorizontalCellCount, lastClm) - startClm

            ' 外枠罫線を引く
            startRng.Resize(pitchV, pitchH).BorderAround _
                LineStyle:=xlContinuous, _
                ColorIndex:=0, _
                Weight:=xlThin

        Next clm
    Next rw
End Sub
以下が使用例です。
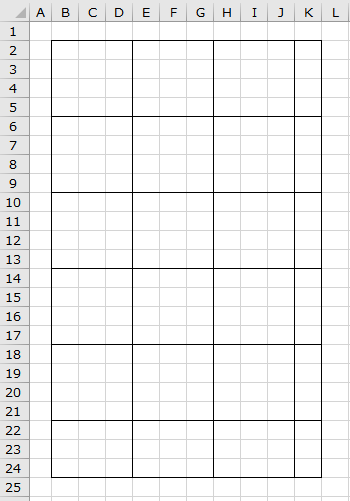
Private Sub 使用例()
    Call AddBorders(Range("B2"), 10, 3, 23, 4)
End Sub
このマクロを実行すると、以下の画像のように、左上がB2セルになって、縦線は3セルごとに10セルまで、横線は4セルごと23セルまで、引かれています。
Follow me!